Boundless Fundraising Email Badge Setup: Mac
Language:
Operating System:
Supported Web Email Clients


Need assistance? Contact our support team.
Supported Desktop Email Clients


Need assistance? Contact our support team.
Unsupported Email Clients
If you use an email client that is not listed on this page the code provided to you for your email badge may still work for that client. Although we do not provide technical support for clients outside of those on this page, searching the web for how to create an HTML signature for your particular client may allow you to determine how to do so.
Need assistance? Contact our support team.
Please Follow the instructions below:
Steps
- Log in to your Participant Center and locate the code for the Email Badge. This may be a button or link that says Email Signature, Email Badge, or something similar.
- Locate TextEdit on your computer (This can be done by clicking on the magnifying glass and entering TextEdit in the search field)
- Once you have found and opened TextEdit, go back to the participation center and select the code by clicking next to it and selecting Command+A on your keyboard. (This will highlight the whole text)
- Then copy the code by hitting Command+C on your keyboard
- Now paste the code to TextEdit by selecting Command+v on your keyboard
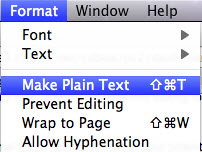
- While in Text Edit, locate the top menu bar and select Format > Make Plain Text.
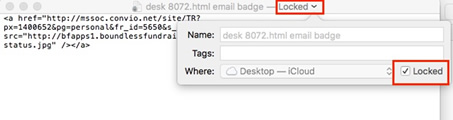
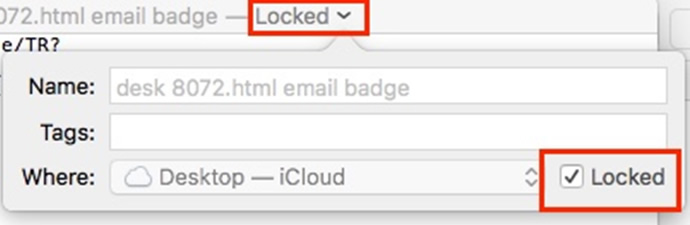
- On the top of the Text Edit file click on the drop-down character and click on the empty box next to Locked to lock the file.
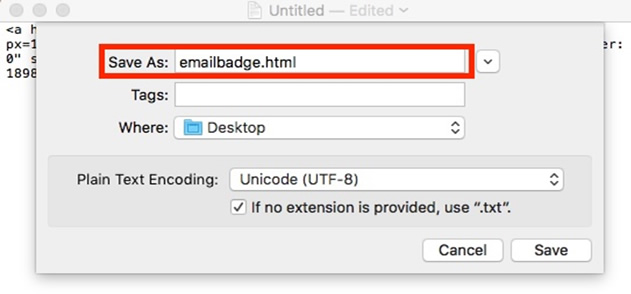
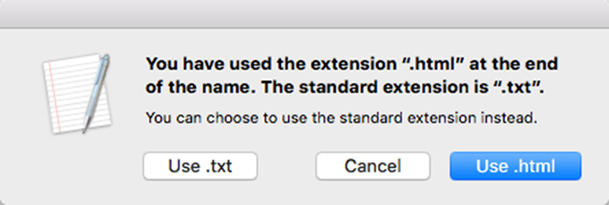
- Then proceed to save the file to your desktop using SAVE AS (Clicking on Help and searching for Save As will easily locate this option) make sure to add .html at the end of the file name and select Save.
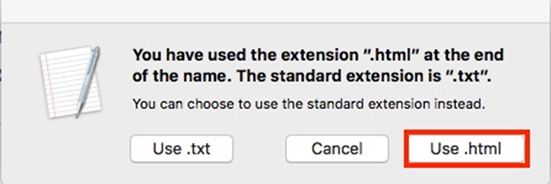
- You will see a pop up asking if you are sure you want to use an html make sure to select the “Use.html” option.
- Exit out of the file by clicking on the red X
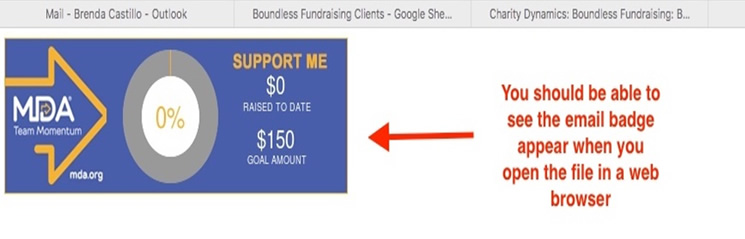
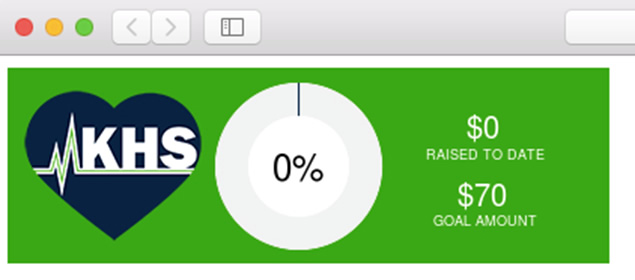
- Locate the saved file if it was not saved on the desktop, and right click the file to open the file in a web browser. You should see the email badge appear in a web browser like this.
- Then open Mac Mail, go to > Preferences > Signatures
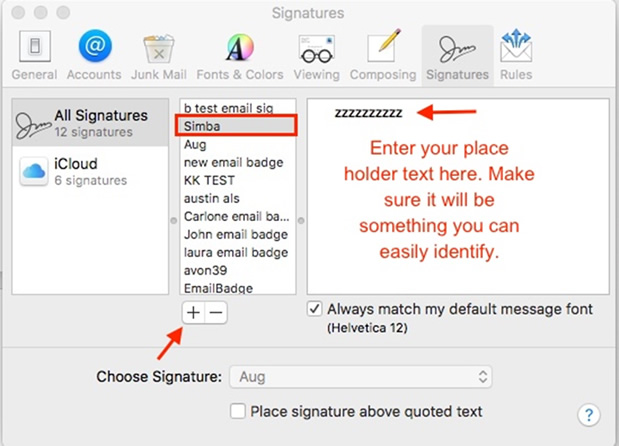
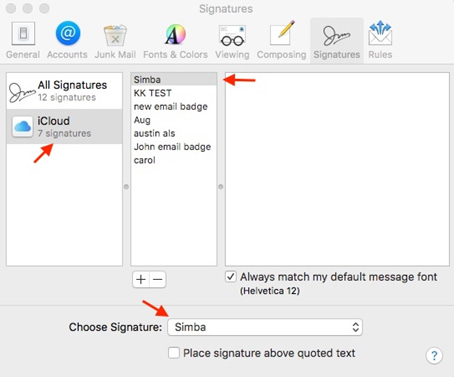
- On the Signature tab, press (+) to create a new signature. Label the name of the signature in this case we entered Simba. In the 3rd box you will need to enter a place holder text you will easily recognize. We recommend entering ZZZZZZZZZZ.
- Close the Signature window and exit the Mail
- While holding down the Option key on your keyboard, click on GO in the Finder bar the top bar, then click on Library
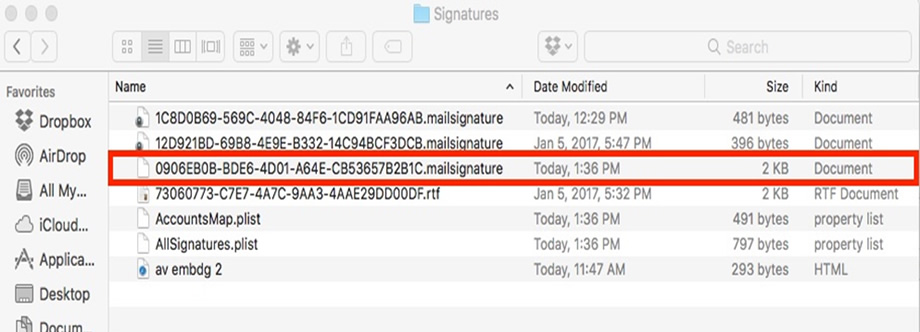
- Follow the following format to find the file. Library > Mail > V8 > MailData > Signatures > Locate the most recently created or modified file in the signatures folder (It should have a date and time stamp) that has the ending of either .mailsignature or .webarchive. Open this file with TextEdit.
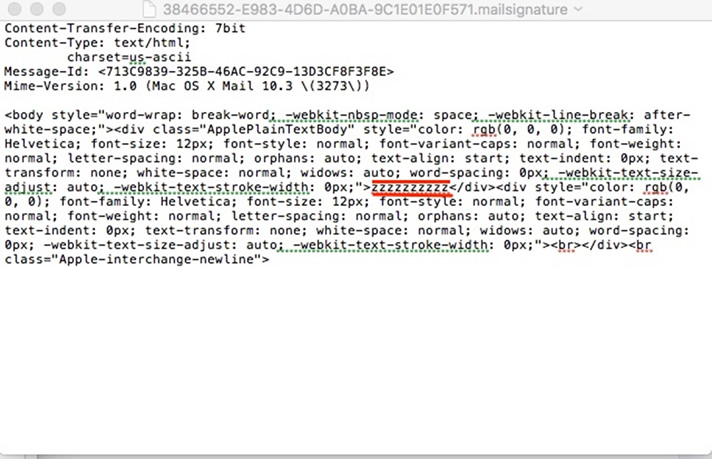
- Look for the place holder content you used. In this case we entered ZZZZZZZZZZ in step 13.
- Then open the first HTML email badge file you saved to your desktop with text edit (This can be done by right clicking selecting open with > TextEdit) Or locate the code from the participation center again.
- Copy the code from the HTML email badge file/ or from the participation center and enter it in the place holder content ZZZZZZZZZZ. (Please, make sure you delete only the place holder letters you used after pasting the code. In this case it woule be zzzzzz; but make sure you do not delete the symbols < > surrounding the content.
- The file should look like the one below. The highlighted in grey is the new code we entered which replaced the ZZZZZZZZZZ.
- Click on the drop-down towards the top of the file and click on the open square next to the lock to ensure the code is locked.
- Exit out of the file
- Open mail > Preferences > Click on the signature in the middle pane and name it. Now drag and drop the signature onto the email account in the left pane where you want it to be available.
- Quit Mail. (This is important for the changes to take place. Be sure to Quite from the Mail drop down menu.)
- Open Mail again > Preferences > Click the signature you created and make sure the bottom of where it says Choose signature matches the name of the signature.
- Exit out of Signatures
- Now Open a new email and select the new signature you just created
- You should now successfully see the email badge in the email.
- Please make sure to send a test email to ensure the recipients can see the email badge correctly.
Need assistance? Contact our support team.
Step 6

Step 7

Step 8

Step 9

Step 11

Step 13

Step 16

Step 17

Step 20

Step 21

Step 25

Please Follow the instructions below:
Steps
- Log in to your Participant Center and locate the code for the Email Badge. This may be a button or link that says Email Signature, Email Badge, or something similar.
- Locate TextEdit on your computer (This can be done by clicking on the magnifying glass and entering TextEdit in the search field)
- Once you have found and opened TextEdit, go back to the participation center and select the code by clicking next to it and selecting Command+Aon your keyboard. (This will highlight the whole text)
- Then copy the code by hitting Command+C on your keyboard
- Now paste the code to TextEdit by selecting Command+v on your keyboard
- While in Text Edit, locate the top menu bar and select Format > Make Plain Text.
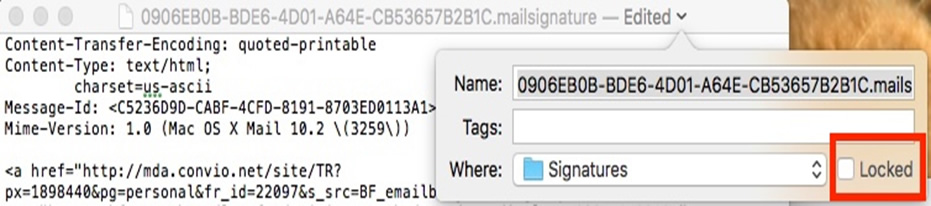
- On the top of the Text Edit file click on the drop-down character and click on the empty box next to Locked to lock the file.
- Then proceed to save the file to your desktop using SAVE AS (Clicking on Help and searching for Save As will easily locate this option) make sure to add .html at the end of the file name and select Save.
- You will see a pop up asking if you are sure you want to use an html make sure to select the “Use.html” option.
- Exit out of the file by clicking on the red X
- Locate the saved file if it was not saved on the desktop, and right click the file to open the file in a web browser. You should see the email badge appear in a web browser like this.
- Then open Mac Mail, go to > Preferences > Signatures
- On the Signature tab, press (+) to create a new signature. Label the name of the signature in this case we entered Simba. In the 3rd box you will need to enter a place holder text you will easily recognize. We recommend entering ZZZZZZZZZZ.
- Close the Signature window and exit the Mail
- While holding down the Option key on your keyboard, click on GO in the Finder bar the top bar, then click on Library
- Follow the following format to find the file. Library > Mail > V4 or V5 > MailData > Signatures > Locate the most recently created or modified file in the signatures folder (It should have a date and time stamp) that has the ending of either .mailsignature or .webarchive . Open this file with TextEdit.
- Look for the place holder content you used. In this case we entered ZZZZZZZZZZ in step 13.
- Then open the first HTML email badge file you saved to your desktop with text edit (This can be done by right clicking selecting open with > TextEdit) Or locate the code from the participation center again.
- Copy the code from the HTML email badge file/ or from the participation center and enter it in the place holder content ZZZZZZZZZZ. (Please, make sure you delete only the place holder letters you used after pasting the code. In this case it woule be zzzzzz; but make sure you do not delete the symbols < > surrounding the content.
- The file should look like the one below. The highlighted in grey is the new code we entered which replaced the ZZZZZZZZZZ.
- Click on the drop-down towards the top of the file and click on the open square next to the lock to ensure the code is locked.
- Exit out of the file
- Open mail > Preferences > Click on the signature in the middle pane and name it. Now drag and drop the signature onto the email account in the left pane where you want it to be available.
- Quit Mail. (This is important for the changes to take place. Be sure to Quite from the Mail drop down menu.)
- Open Mail again > Preferences > Click the signature you created and make sure the bottom of where it says Choose signature matches the name of the signature.
- Exit out of Signatures
- Now Open a new email and select the new signature you just created
- You should now successfully see the email badge in the email.
- Please make sure to send a test email to ensure the recipients can see the email badge correctly.
Need assistance? Contact our support team.
Step 6
Step 7
Step 8
Step 9
Step 11
Step 13
Step 16
Step 17
Step 20

Step 21
Step 25
Please Follow the instructions below:
Steps
- Log in to your Participant Center and locate the code for the Email Badge. This may be a button or link that says Email Signature, Email Badge, or something similar.
- Locate TextEdit on your computer (This can be done by clicking on the magnifying glass and entering TextEdit in the search field)
- Once you have found and opened TextEdit, go back to the participation center and select the code by clicking next to it and selecting Command+Aon your keyboard. (This will highlight the whole text)
- Then copy the code by hitting Command+C on your keyboard
- Now paste the code to TextEdit by selecting Command+v on your keyboard
- While in Text Edit, locate the top menu bar and select Format > Make Plain Text.
- On the top of the Text Edit file click on the drop-down character and click on the empty box next to Locked to lock the file.
- Then proceed to save the file to your desktop using SAVE AS (Clicking on Help and searching for Save As will easily locate this option) make sure to add .html at the end of the file name and select Save.
- You will see a pop up asking if you are sure you want to use an html make sure to select the “Use.html” option.
- Exit out of the file by clicking on the red X
- Locate the saved file if it was not saved on the desktop, and right click the file to open the file in a web browser. You should see the email badge appear in a web browser like this.
- Then open Mac Mail, go to > Preferences > Signatures
- On the Signature tab, press the (+) to create a new signature. Label the signature in this example we entered Simba. In the 3rd box you will need to enter a place holder text you will easily recognize. We recommend entering ZZZZZZZZZZZZZZ
- Close the Signature window and exit Mail
- While holding down the Option key on your keyboard, click on GO in the Finder bar the top bar, then click on Library
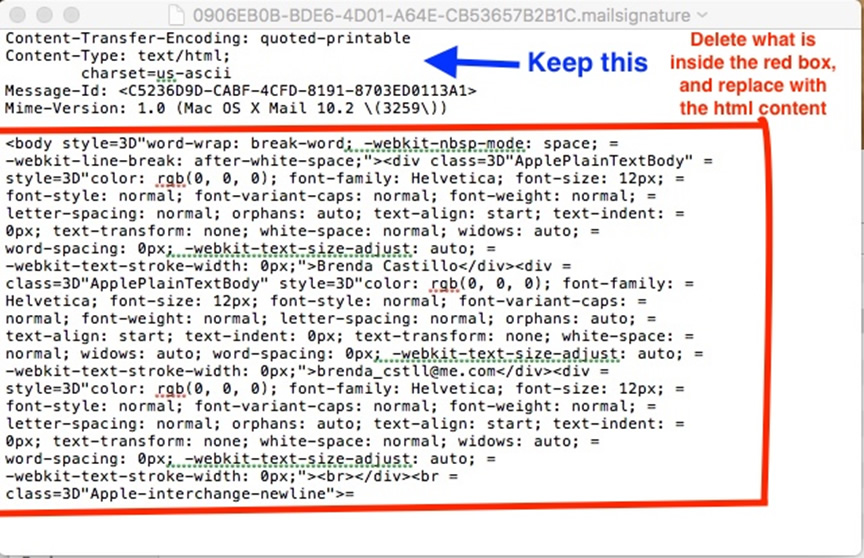
- Follow the following format to find the file. Mail > V4 > MailData > Signatures > Locate the most recently created or modified file in the signatures folder that has the ending of either .mailsignature or .webarchive . Open this file with TextEdit by right clicking on the file name and selecting TextEdit to open the file
- You should see various lines of code. At the top there will be 4 or 5 lines of metadata that will NOT be removed. After these lines is a space and some HTML code will be below that space. Delete the second section of meta data.
- Copy the code from the html file you just saved and paste this code where you just deleted the other metadata
- Close the HTML file where you copied the code from
- Go back to the .mailsignature file in TextEdit (it should be open already) there should be a drop-down menu by the file name (top middle bar) Click on the drop down and click on the open square next to the lock to ensure the code is locked.
- Exit out of the file
- Open mail > Preferences > Click on the signature in the middle and drag and drop the signature to the email account you wish to add the signature to.
- It is important to make sure to Quit Mail for this step instead of exiting out of mail. To Quit Mail, click on the Mail tab in the top of the screen nav bar, scroll down and Select Quit Mail.
- Choose the signature you just updated from the library and drop it under the correct email signature.
- Exit out of Signatures
- Now Open a new email and select the new signature you just created
- You should now successfully see the email badge in the email.
- Please make sure to send a test email to ensure the recipients can see the email badge correctly.
Need assistance? Contact our support team.
Step 6
Step 7
Step 8
Step 9
Step 11
Step 16
Step 17
Step 20
Step 24
- Open Mail, go to Mail > Preferences
- On the Signature tab, press + to create a new signature. Don’t worry about the content, this will be overwritten later.
- Close the Signature window and exit the Mail app
- Open the Finder program
- While holding down the Option key on your keyboard, click on Go in the top bar, then click on Library
- Navigate to the appropriate file for your machine’s setup. It is recommended that you first look for the location where iCloud is enabled and if you cannot find that location, then look for the location where iCloud is not enabled:
- Locate the most recently created or modified file in the signatures folder that has the ending of either .mailsignature (for OSX 10.8 users) or .webarchive (for OSX 10.7 and lower users).
- Right-click on the file, go to Open With and in the drop down select Other
- Locate and click on TextEdit in the list of applications that appears and click Open
- Log in to your Participant Center or HQ page and locate the code for the Email Badge. This may be a button or link that says Fundraise with your Email or Flash your Badge or something similar.
- Select the code by clicking next to it and hitting Command+A on your keyboard.
- Now copy the code by hitting Command+C on your keyboard
- Return to the file in TextEdit and you should see various lines of code. At the top will be 4 or 5 lines of metadata that will not be removed. After these lines is a space and some HTML code will be below that space. Click and drag over the HTML code after this space and hit the Delete key on your keyboard to remove it.
- Click in the location the previous HTML code was and hit Command+V on your keyboard to paste your Email Badge HTML code into the file.
- Hit Command+S on your keyboard to save the file.
- Quit TextEdit and open up the Mail app
- Even though you saved this file, you will still need to lock the file when using the Yosemite OS version (10.10.4 or higher). With your text editor now closed and the file saved, find it again in Finder and press Command + I to bring up the info pane for the file. On this info pane, mark the Locked checkbox.
- Open your email account and create a new message. Use the Signatures field to select your new signature. If you do not see your signature in this list it may not be associated properly with your email account. To resolve this, follow these next few steps:
- Go to Mail > Preferences and click on the Signature tab
- In the left column, click on All Signatures. You should see your new signature listed in the middle column.
- Click and drag your signature name into the left column on top of the email address you want the signature associated with.
- Close out the signature window and attempt to add your signature to a new message.
Note:
- You may not see the email signature under preferences when editing. However, if you create a test email message, the email signature does appear.
Need assistance? Contact our support team.
Please Follow the instructions below:
Steps
1. Log into your HQ or Participant Center and copy (Command+c) the badge code.
2. Open TextEdit and paste (Command+v) the badge code into the application.
3. On TextEdit click on Format and choose Make Plain Text.
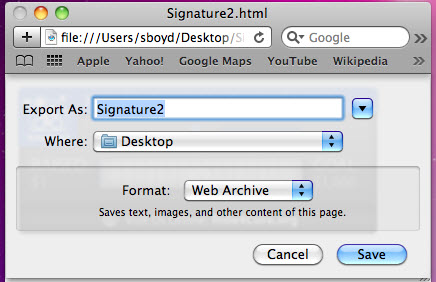
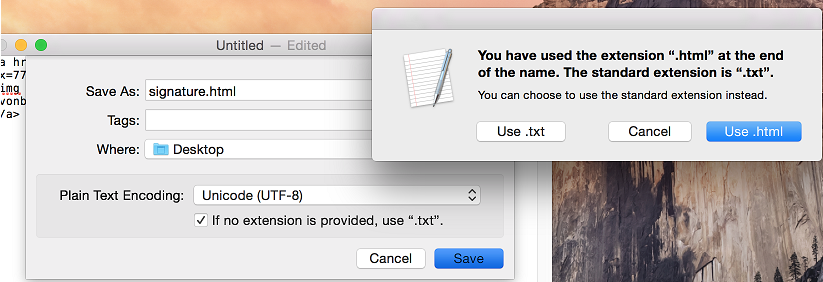
4. Go to File-> Save As and save file as Signature2.html on your Desktop. Click the Save button.
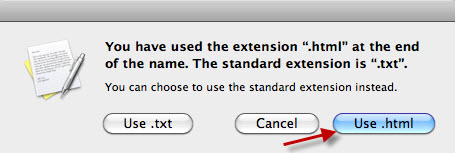
5. A message will appear about using the .html extension. Click the Use .html button. A file labled Signature2.html will appear on your Desktop.
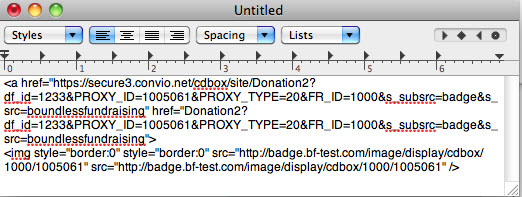
6. Open Signature2.html by double clicking it. Your badge will appear.
7. Click File -> Save As -> Format: Signature2.webarchive and save to the desktop. A webarchive file will appear on your desktop.
8. Open Mail, then go to Preferences -> Signatures.
9. Next, go to your desktop and open a New Finder window (Command+n). Holding down the Option key, click on Go in the top menu bar, then on Library. Navigate to the following location based on which OSX version your machine is running:
OSX 10.6 Snow Leopard: Home/Library/Mail/Signatures
OSX 10.7 Lion (files are: .webarchive): ~/Library/Mail/V2/MailData/Signatures/
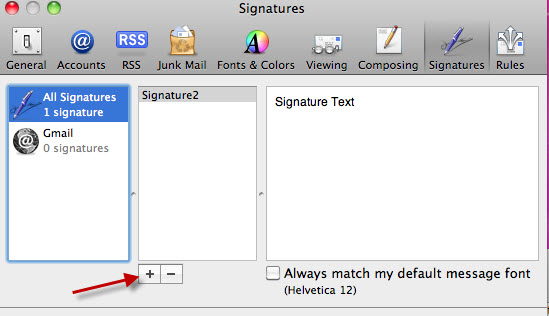
10. Go back to Mail. Select Mail-> Preferences and click on the Signatures tab. Be sure to keep the Finder window open and visible. Click on ‘All Signatures’ (left hand pane), then click the + to add a signature. Close the Signatures window, quit Mail and return to the finder window. Find the file with the Modified Date showing today. It will have a cryptic file name with a .webarchive extension. (See Screenshot 10.1 for an example.)
11. Drag and drop the signature file from the Finder folder and put it on your Desktop. Keep your Finder window open and visible.
12. Quit Mail. (This is important for the changes to take place. Be sure to Quite from the Mail drop down menu.)
13. Click onto the signature file you just moved to your desktop. Copy (Command+c) the file name. Now delete this file.
14. Paste (Command+v) the copied file name over the signature2.webarchive file name (the one you saved onto your desktop in Step 7).
15. Drag and drop this file back into your Signatures folder in the Finder window.
16. Launch Mail. Go back to Mail > Preferences > Signatures. The changed signature will be available. A ? will be showing in the right panel.
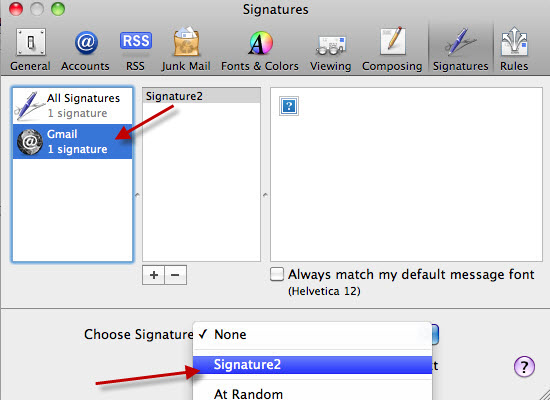
17. Click on the signature in the middle pane and name it. Now drag and drop the signature onto the email account in the left pane where you want it to be available.
18. Choose the signature you just created in the selector at the bottom. If you have many signatures, it may ask how you want them ordered. It won’t matter.
19. Open a new email and select the signature you just created.
PLEASE NOTE- The signature may still appear as a ? at the bottom of your unsent emails. To test it out you can send yourself an email or look in the Sent Mail folder after you have sent a message. In the Sent Mail folder you may have to click the Load Images button to get the badge to show.
Need assistance? Contact our support team.
Step 1

Step 2
Step 3
Step 4

Step 5
Step 7
Step 10
Step 10.1

Step 17
Please Follow the instructions below:
Steps
- Sign into your Participation Center or HQ and locate the Email Badge code.
- Select the Code (Command + C)
- Open Text Edit and paste the code (Command + V).
- Click on Format and choose Make Plain Text. Press Ok on the confirmation box
- Go to Help > search for Save As > Select Save As to save the file > and save the file as signature name .html
- A pop will appear > Select “Use.html”
- Exit out of the Text Edit File by clicking on the Red X
- Locate the file you recently saved. Right click on the mouse > Select Open With a Web Browser
- You should be able to see the Email Badge with your Raised amount and Goal amount in the Web Browser
- Highlight the badge (Command + A) Copy the badge (Command + C)
- Sign in Gmail
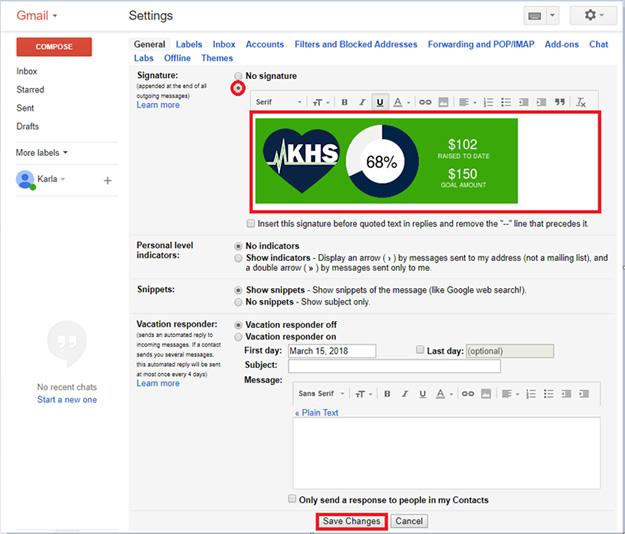
- Go to the Gear Icon (top right corner), Click on Settings, Scroll down to the Signature section.
- Make sure the Signature radio button is selected
- Paste the email badge in the signature box, and select save changes
Need assistance? Contact our support team.
Step 5
Step 6
Step 9
Need assistance? Contact our support team.
Please Follow the instructions below:
Steps
- Sign into your Participation Center or HQ and locate the Email Badge code.
- Select the Code (Command + C)
- Open Text Edit and paste the code (Command + V).
- Click on Format and choose Make Plain Text. Press Ok on the confirmation box
- Go to Help > search for Save As > Select Save As to save the file > and save the file as signature name .html
- A pop will appear > Select “Use.html”
- Exit out of the Text Edit File by clicking on the Red X
- Locate the file you recently saved. Right click on the mouse > Select Open With a Web Browser
- You should be able to see the Email Badge with your Raised amount and Goal amount in the Web Browser
- Highlight the badge (Command + A) Copy the badge (Command + C)
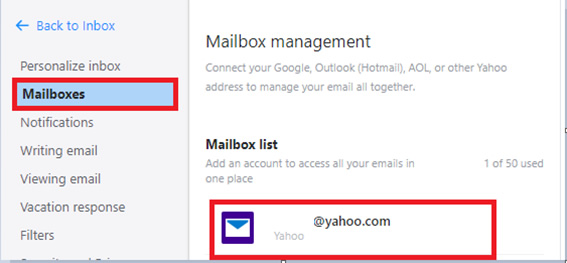
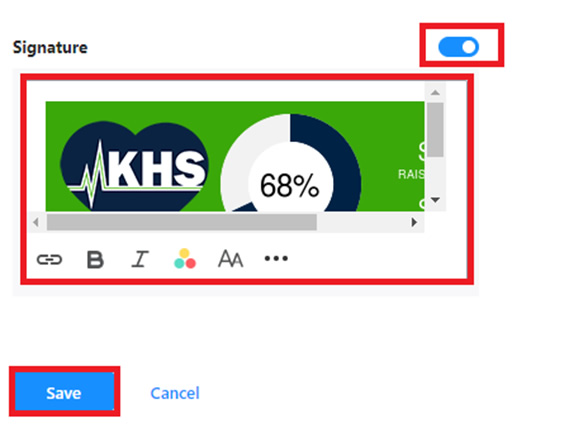
- Sign in Yahoo
New Version of Yahoo!
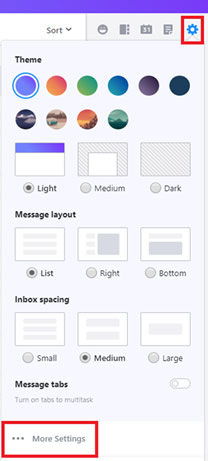
- Select the Gear icon (top right corner)
- Select More Settings
- On the left-hand column select Mailboxes
- Select the Yahoo email on the Mailbox List
- Select the blue radio button to on
- Paste the code in the email signature box
- Select Save
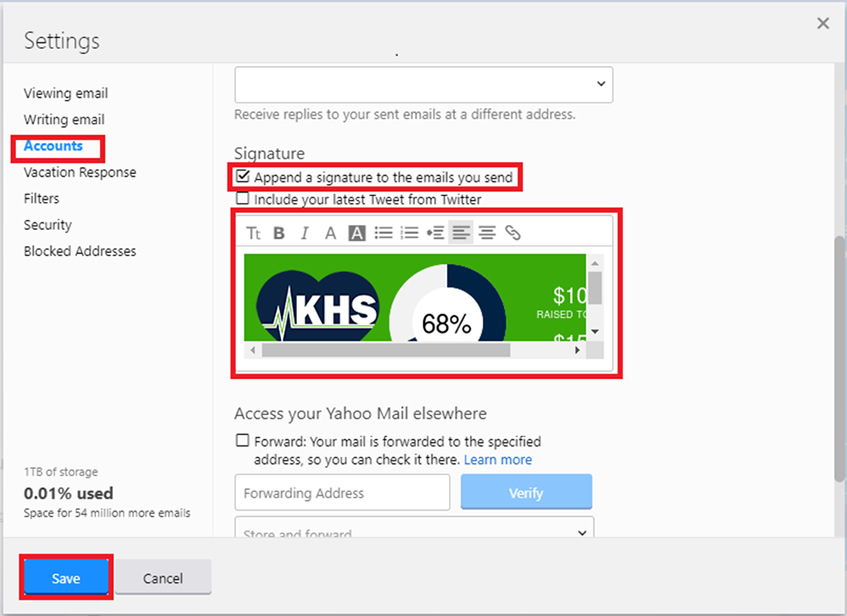
Old Version of Yahoo!
- Click on the Gear icon (top right corner)
- Select Settings, then Accounts
- Click on the yahoo account you would like to use under Email Addresses
- Check mark the box next to “Append a signature to the emails you send” under the Signature section
- Click on the signature box and paste the code (command + v)
- Click Save
Need assistance? Contact our support team.
Step 5
Step 6
Step 9
Step 12 (New)
Step 12 (Old)

Please Follow the instructions below:
Steps
- Open your Participant Center or HQ Page. Click on the email badge button and you should see your email badge with the HTML code listed below it. Click inside the box with the code and hit Command + A on your keyboard to select the code. Then hit Command + C to copy the code.
- Open up TextEdit and press Command+V to paste the code in it.
- Go to Format from the top menu and select Make Plain Text.
- To save the file, select File from the menu bar at the top and select Save. Save the file as signature.html to your Desktop folder and select Save.
- A pop-up message will appear. Select Use .hmtl.
- Open Finder to locate the file you just created. Once you have located the file, select Open With and select the desired browser.
- Copy the image by clicking in the white space of the browser window and use Command + A follow by Command + C.
- Log into your Outlook.com account and click the gear icon in the top right corner of the page. Select Options from the drop-down menu that appears.
- Scroll down to find the Writing email section and select Formatting, font and signature.
- Find the Personal signature section and make sure Rich text is selected from the formatting bar. Then place your mouse cursor in the signature text box and paste the badge image by using Command + V. It may take a few seconds to load.
- Scroll to the bottom of the page and select Save.
Need assistance? Contact our support team.
Step 1
Step 2
Step 3
Steps 4-5
Please Follow the instructions below:
Steps
- Sign into your Participation Center or HQ and locate the Email Badge code.
- Select the Code (Command + C)
- Open Text Edit and paste the code (Command + V).
- Click on Format and choose Make Plain Text. Press Ok on the confirmation box
- Go to Help > search for Save As > Select Save As to save the file > and save the file as signature name .html
- A pop will appear > Select “Use.html”
- Exit out of the Text Edit File by clicking on the Red X
- Locate the file you recently saved. Right click on the mouse > Select Open With a Web Browser
- You should be able to see the Email Badge with your Raised amount and Goal amount in the Web Browser
- Highlight the badge (Command + A) Copy the badge (Command + C)
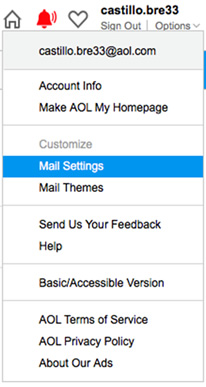
- In a new web browser tab sign into your AOL Email
- Top right-hand corner select “Options” > “Mail Settings”
- On the Left-hand side select “Compose”
- Under “Rich Text/HTML” make sure the box next to “Use Rich Text/HTML Editing” is checked and is blue.
- Under “Signature” in the edit box paste the image that was copied (Command + V)
- Please note – it should say “Use Signature” above the Text Box.
- Select “Save Settings” at the bottom of the page to save the changes.
- Send a test email to yourself or a friend to ensure the Email Badge is displaying as desired.
Need assistance? Contact our support team.
Step 5
Step 6
Step 9
Step 12
Please Follow the instructions below:
Steps
- Sign into your Participation Center or HQ and locate the Email Badge code.
- Select the Code (Command + C)
- Open Text Edit and paste the code (Command + V).
- Click on Format and choose Make Plain Text. Press Ok on the confirmation box
- Go to Help > search for Save As > Select Save As to save the file > and save the file as signature name .html
- A pop will appear > Select “Use.html”
- Exit out of the Text Edit File by clicking on the Red X
- Locate the file you recently saved. Right click on the mouse > Select Open With a Web Browser
- You should be able to see the Email Badge with your Raised amount and Goal amount in the Web Browser
- Highlight the badge (Command + A) Copy the badge (Command + C)
- Go to Outlook Mail
- Click on New Email
- Click on the Signature icon, then Signature again
- Click on New signature, and label the signature
- Paste the email badge in the signature box with (command + V)
- Select OK
Need assistance? Contact our support team.
Step 5
Step 6
Step 9
Step 13
Step 14
Step 15

Please Follow the instructions below:
Steps
- Sign into your Participation Center or HQ and locate the Email Badge code.
- Select the Code (Command + C)
- Open Text Edit and paste the code (Command + V).
- Click on Format and choose Make Plain Text. Press Ok on the confirmation box
- Go to Help > search for Save As > Select Save As to save the file > and save the file as signature name .html
- A pop will appear > Select “Use.html”
- Exit out of the Text Edit File by clicking on the Red X
- Locate the file you recently saved. Right click on the mouse > Select Open With a Web Browser
- You should be able to see the Email Badge with your Raised amount and Goal amount in the Web Browser
- Highlight the badge (Command + A) Copy the badge (Command + C)
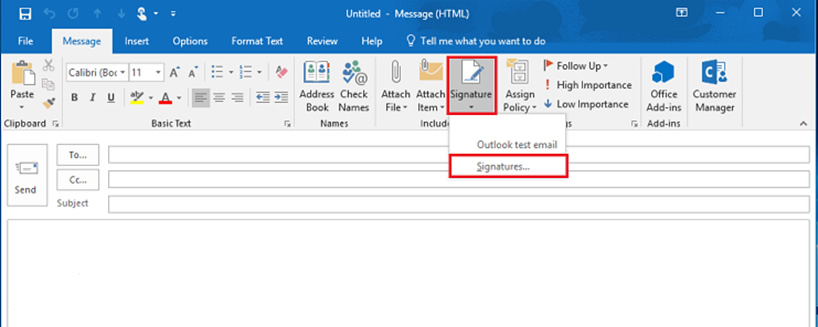
- Go to Outlook Mail
- Open a New Message
- On the Message tab, under the Include Group, Select Signature, and then Signature again.
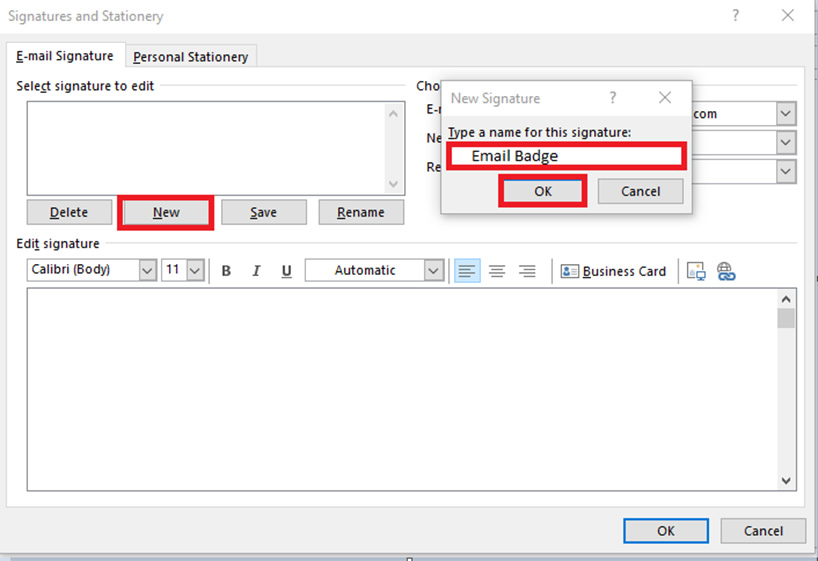
- On the Email Signature tab, click New
- Name the signature, then click OK
- In the Edit signature box click (Command + V) to paste the signature in the box
- Select OK
Need assistance? Contact our support team.
Step 5
Step 6
Step 9