Boundless Fundraising Email Badge Setup
Language:
Operating System:


Unsupported Email Clients
If you use an email client that is not listed on this page the code provided to you for your email badge may still work for that client. Although we do not provide technical support for clients outside of those on this page, searching the web for how to create an HTML signature for your particular client may allow you to determine how to do so.
Need assistance? Contact our support team.
Please Follow the instructions below:
Steps
- Sign into your Participation Center or HQ and locate the Email Badge code.
- Select the Code (Ctrl + A)
- Copy the Code (Ctrl + C)
- Open Notepad
- Paste code in Notepad (Ctrl + V)
- Save the Code By following the steps below:
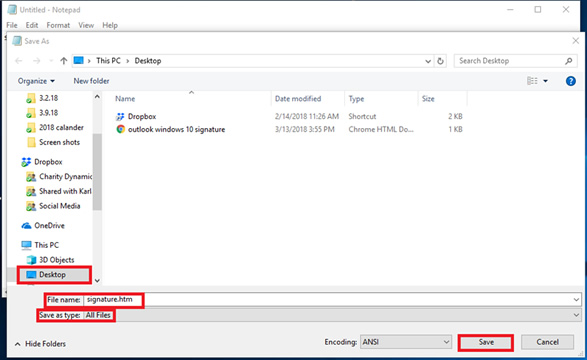
Please make a note of where the file is saved. We recommend saving it to the Desktop.- Click File
- Click Save As
- In File Name Box type: signature.html
- In Save as type select (All Files)
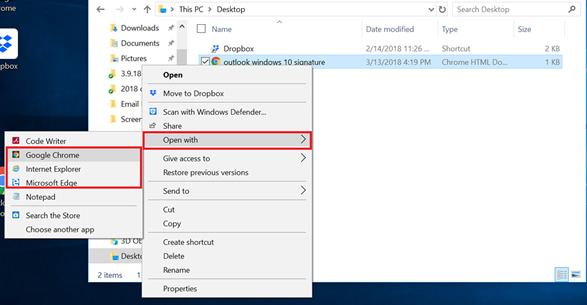
- Locate the file you recently saved (likely Desktop Folder)
- Right-Click on the file
- Click Open With
- Select a Web Browser
- Click (Ctrl + A)
- Click (Ctrl + C)
- Sign in Gmail
- Paste the email Badge in Gmail
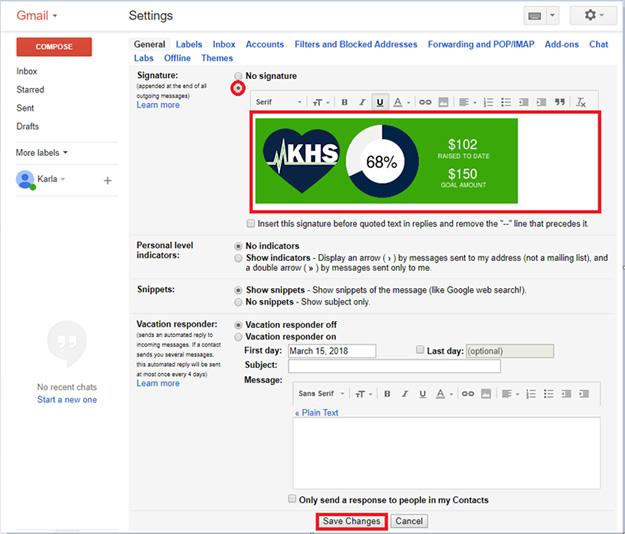
- Click Gear Icon
- Click settings
- Click Signature circle
- In Signature Box Click (Ctrl + V)
- Click Save Changes
Need assistance? Contact our support team.
Step 6
Step 7
Step 11

Hotmail is now Outlook.com. If you have a Hotmail account, please see the instructions below for Outlook.com on how to add your email badge.
Need assistance? Contact our support team.
Please Follow the instructions below:
Steps
- Sign into your Participation Center or HQ and locate the Email Badge code.
- Select the Code (Ctrl + A)
- Copy the Code (Ctrl + C)
- Open Notepad
- Paste code in Notepad (Ctrl + V)
- Save the Code By following the steps below:
Please note where the file is saved. We recommend saving it to Desktop.- Click File
- Click Save As
- In File Name Box type: signature.html
- In Save as type select (All Files)
- Locate the file you recently saved (likely Desktop Folder)
- Right-Click on the file
- Click Open With
- Select a Web Browser
- Click (Ctrl + A)
- Click (Ctrl + C)
- Sign in Outlook (Hotmail.live.com)
- Paste the email Badge in Outlook (Hotmail.live.com)
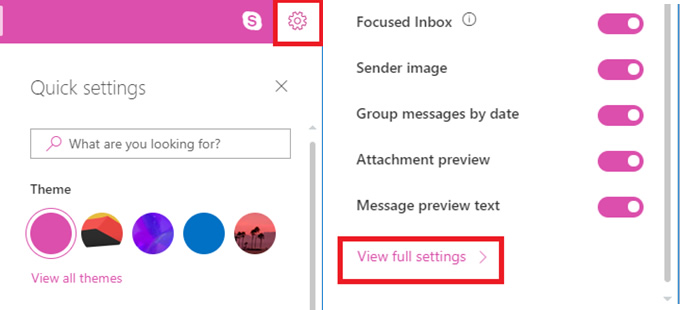
- Click Gear Icon
- Click View Full Settings
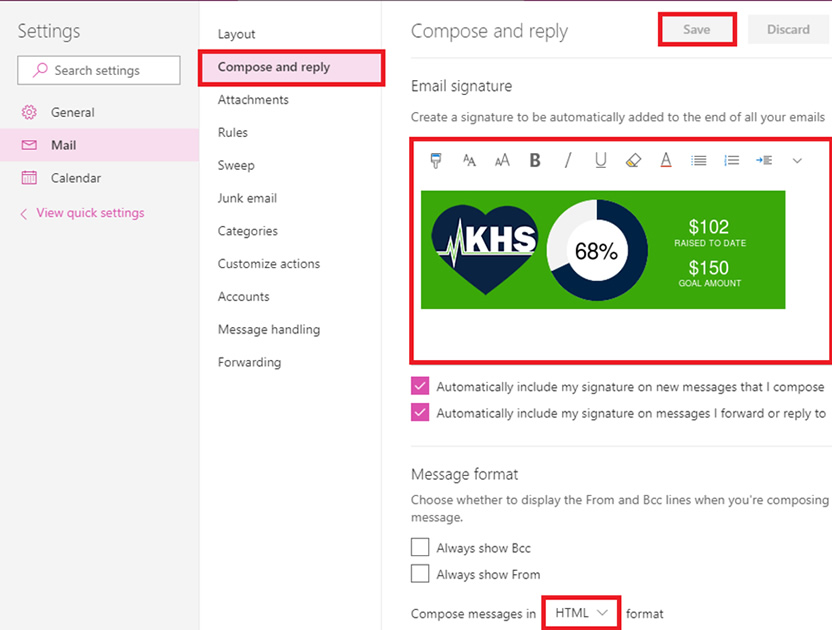
- Click Compose and reply
- In signature box click (Ctrl + V)
- Under Compose messages change it to HTML format
- Click Save
Need assistance? Contact our support team.
Step 6
Step 7
Step 11
Please Follow the instructions below:
Steps
- Sign into your Participation Center or HQ and locate the Email Badge code.
- Select the Code (Ctrl + A)
- Copy the Code (Ctrl + C)
- Open Notepad
- Paste code in Notepad (Ctrl + V)
- Save the Code By following the steps below:
Please note where the file is saved. We recommend saving it to Desktop.- Click File
- Click Save As
- In File Name Box type: signature.html
- In Save as type select (All Files)
- Locate the file you recently saved (likely Desktop Folder)
- Right-Click on the file
- Click Open With
- Select a Web Browser
- Click (Ctrl + A)
- Click (Ctrl + C)
- Sign in Aol Mail
-
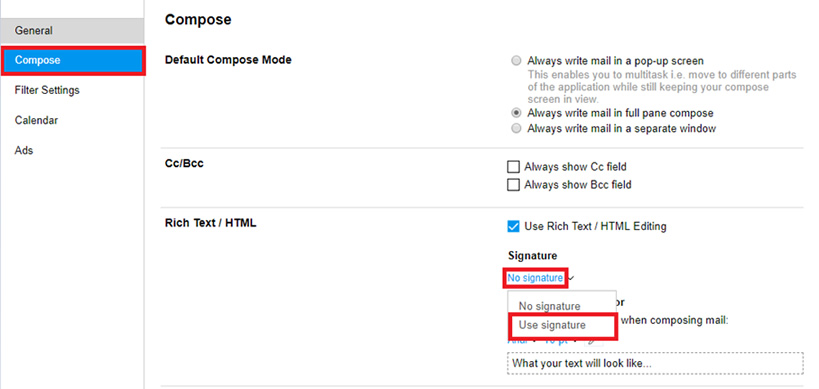
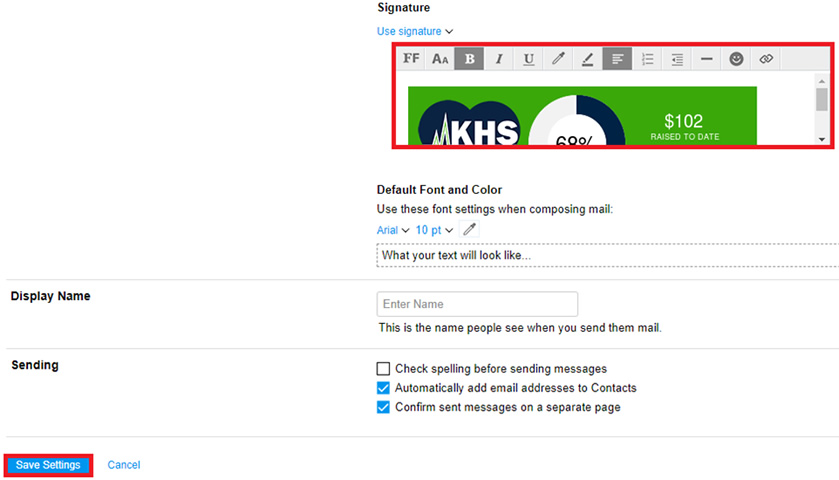
- Click Options
- Click Mail Settings
- Click Compose
- Click Use Signature
- Paste the email Badge in Aol Mail
- In signature box Click (Ctrl + V)
- Click Save Settings
Need assistance? Contact our support team.
Step 6
Step 7
Step 11

Please Follow the instructions below:
Steps
- Sign into your Participation Center or HQ and locate the Email Badge code.
- Select the Code (Ctrl + A)
- Copy the Code (Ctrl + C)
- Open Notepad
- Paste code in Notepad (Ctrl + V)
- Save the Code By following the steps below:
Please note where the file is saved. We recommend saving it to Desktop.- Click File
- Click Save As
- In File Name Box type: signature.html
- In Save as type select (All Files)
- Locate the file you recently saved (likely Desktop Folder)
- Right-Click on the file
- Click Open With
- Select a Web Browser
- Click (Ctrl + A)
- Click (Ctrl + C)
- Sign in to Yahoo
New Version of Yahoo!
- Paste the email Badge in New version of Yahoo
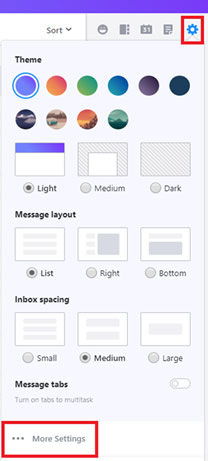
- Click Gear Icon
- Click More Settings
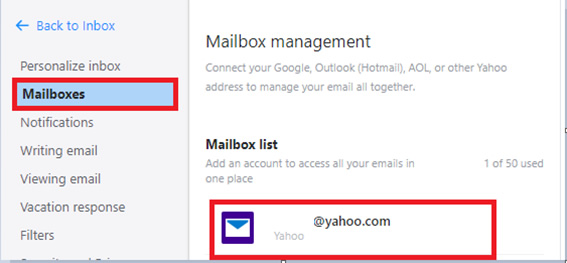
- Click Mailboxes
- Click on the Account Name
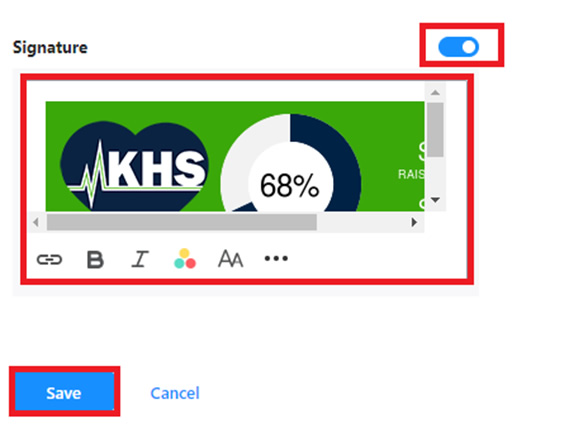
- Click on Button
- In Signature Box Click (CTRL + V)
- Click Save
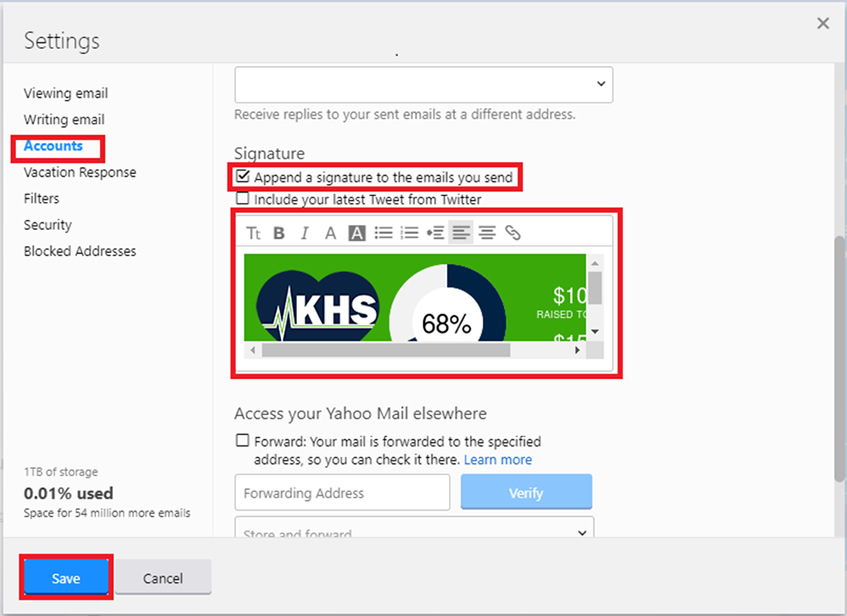
Old Version of Yahoo!
- Paste the email Badge in Old version of Yahoo
- Click Gear Icon
- Click Settings
- Click Accounts
- Click on the Account Name
- Click on Append a signature to the emails you send
- In Signature Box Click (CTRL + V)
- Click Save
Need assistance? Contact our support team.
Step 6
Step 7
Step 11 (New)
Step 11 (Old)
Please Follow the instructions below:
Steps
- Sign into your Participation Center or HQ and locate the Email Badge code.
- Select the Code (Ctrl + A)
- Copy the Code (Ctrl + C)
- Open Notepad
- Paste code in Notepad (Ctrl + V)
- Save the Code By following the steps below:
Please note where the file is saved. We recommend saving it to Desktop.- Click File
- Click Save As
- In File Name Box type: signature.html
- In Save as type select (All Files)
- Locate the file you recently saved (likely Desktop Folder)
- Right-Click on the file
- Click Open With
- Select a Web Browser
- Click (Ctrl + A)
- Click (Ctrl + C)
- Sign in to Outlook
- Paste the email Badge in Outlook
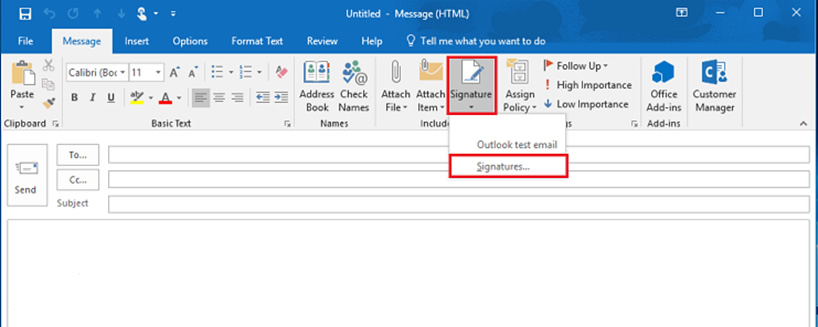
- Click New Email
- Click Signature Box
- Click Signature
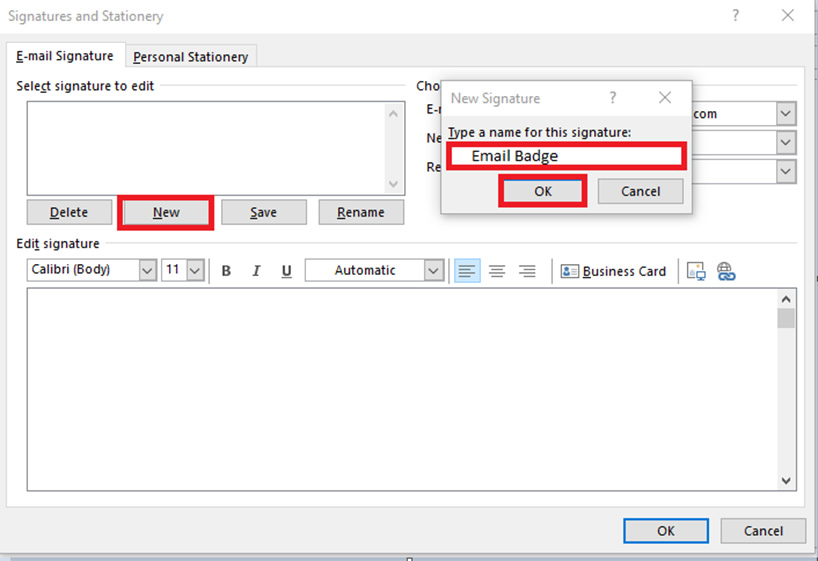
- Click New
- Type the name of the signature you would like to name it.
- In the Email Signature Box Click (CTRL + V)
- Click OK
Need assistance? Contact our support team.
Step 6
Step 7
Step 11


Please Follow the instructions below:
Steps
- Sign into your Participation Center or HQ and locate the Email Badge code.
- Select the Code (Ctrl + A)
- Copy the Code (Ctrl + C)
- Open Notepad
- Paste code in Notepad (Ctrl + V)
- Save the Code By following the steps below:
Please note where the file is saved. We recommend saving it to Desktop.- Click File
- Click Save As
- In File Name Box type: signature.html
- In Save as type select (All Files)
- Locate the file you recently saved (likely Desktop Folder)
- Right-Click on the file
- Click Open With
- Select a Web Browser
- Click (Ctrl + A)
- Click (Ctrl + C)
- Sign in to Outlook
- Open new message
- On Message tab, in Included group, click Signature, and then click Signatures
- On E-mail Signature tab, click New
- Type a name for the signature, click OK
- In Edit signature box click (Ctrl + V)
- Click OK
Need assistance? Contact our support team.
Step 6
Step 7
If you haven’t already saved your Email Badge HTML code to a file, follow steps 1 to 5, otherwise skip to step 6:
- Open your Participant Center or HQ Page. Click on the email badge button and you should see your email badge with the html code listed below it. Copy the code.
- Open up Microsoft Notepad press ctrl+v to paste the code in it.
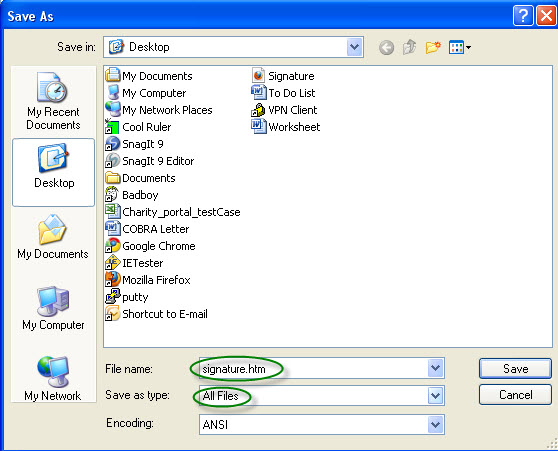
- In the menu bar, select File then Save As
- Set the file name as signature.htm (the .htm MUST be at the end of the file name) and set the Save As Type drop down to All Files
- Make note of the location you are saving the file (the Documents folder is recommended) and click Save
- Open Outlook Express and on the Tools menu, click Options.
- Click the Signatures tab.
- Click New, and then click File.
- Click Browse and locate the file you previously saved in step 5. Click Open.
- Click Save to save your signature.
Need assistance? Contact our support team.
- Open your Participant Center or HQ Page. Click on the email badge button and you should see your email badge with the html code listed below it. Copy the code.
- Open Mozilla Thunderbird and click on Tools then Account Settings
- Find the email address you want to change the signature for and in the Signature text section, click the check box next to Use HTML (e.g., bold)
- Click in the box just below that and paste in the code you previously copied by hitting ctrl+v on your keyboard.
- Click OK
- Write a new email message and you should see your signature populate in the window
Need assistance? Contact our support team.
If you haven’t already saved your Email Badge HTML code to a file, follow steps 1 to 5, otherwise skip to step 6:
- Open your Participant Center or HQ Page. Click on the email badge button and you should see your email badge with the html code listed below it. Copy the code.
- Open up Microsoft Notepad press ctrl+v to paste the code in it.
- In the menu bar, select File then Save As
- Set the file name as signature.htm (the .htm MUST be at the end of the file name) and set the Save As Type drop down to All Files
- Make note of the location you are saving the file (the Documents folder is recommended) and click Save
- Open Lotus Notes to your mail application.*
- Select File>Preferences.
- On the Preferences page select Mail in the left column. Then select the Signature tab at the top of the page.
- On the Signature page select the check box “Automatically append a signature…”. Then select the radio button for “HTML or Image File”
- At the bottom of the page enter the location of the .htm file you created in Step 2. Click OK.
- When you open a new message you will see the badge at the bottom of the message. Note- the badge hyperlink will not be live until you send the message. To test it, send a message to yourself or open a sent message in your Sent message box.* Lotus Notes version 8.5 was used for this FAQ. Setup steps may differ based on version.
Need assistance? Contact our support team.
Step 4
Step 7

Step 8
Step 9
Step 10
Step 11